Deprecated: Automatic conversion of false to array is deprecated in /home/wcc1969/public_html/phasergames.com/wp-content/plugins/publitio-offloading/includes/class-publitio-offloading.php on line 577
I became a flash developer in 2001. Three years later ActionScript 2 came out, and then in 2006 ActionScript 3 arrived. In 2009 I made my first trip to Silicon Valley, and I was still mostly relying on ActionScript 2. The day before I left, Adobe announced that our Flash programs would compile to the iPhone, and by the time the plane landed in San Jose, Apple had killed Adobe’s plans.
I started switching over to As3 about that time and used it for the next 7 years until it was clear Flash was not going to be a viable option. I took a long time to switch over to As3, and I took a long time to look for alternatives to flash, because I had grown comfortable. However, for years I denied myself all those new features of as3, and cool new things like Phaser. I held myself back because I wanted to just sit and make games and not deal with the frustration of having to learn new stuff.
Now Phaser 3 is about 3 months old. I don’t want to repeat the mistakes of the past and miss out! There are some really cool features in Phaser 3 and I want to make great games.
Also, once you get past the first few steps, you’ll find Phaser 3 very familiar.
Let’s dive in, and get set up.
Quick Set Up
Declaring a game object
Head over to Phaser.io and grab the new Phaser3.js file
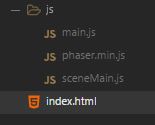
Make a new project folder with an HTML file and a js folder, with 2 empty js files called main.js and sceneMain.js
Place the phaser.min.js file in the js folder.

The Html File
<!DOCTYPE html>
<html>
<head>
	<title></title>
	<script type="text/javascript" src="js/phaser.min.js"></script>
	<script type="text/javascript" src="js/sceneMain.js"></script>
	<script type="text/javascript" src="js/main.js"></script>

</head>
<body>
<div id="phaser-game"></div>
</body>
</html>
The main.js file
The main.js file sets up the Phaser game object
What’s changed?
In Phaser CE, we passed the height, width, mode and div tag into the game’s constructor. Now we pass a single config object to the game’s construction instead
var game = new Phaser.Game(config);
The Config File
Here is an example config file. It contains the parameters mentioned before, but also takes scenes in an array; We will build SceneMain mentioned in the config file later.
var config = {
        type: Phaser.AUTO,
        width: 480,
        height: 640,
        parent: 'phaser-game',
        scene: [SceneMain]
    };
One File Fits All
I like to make one file that sets up one config file for desktop and one for mobile. I use the navaigator.userAgent to detect if the script is running on a mobile device or not. I’m often asked why I don’t use the nice built-in features of Phaser to detect mobile. The answer is because I need to detect it before we declare the game object.
Main.js
var isMobile = navigator.userAgent.indexOf("Mobile");
if (isMobile == -1) {
    isMobile = navigator.userAgent.indexOf("Tablet");
}
if (isMobile == -1) {
    var config = {
        type: Phaser.AUTO,
        width: 480,
        height: 640,
        parent: 'phaser-game',
        scene: [SceneMain]
    };
} else {
    var config = {
        type: Phaser.AUTO,
        width: window.innerWidth,
        height: window.innerHeight,
        parent: 'phaser-game',
        scene: [SceneMain]
    };
}
var game = new Phaser.Game(config);
Declaring a Scene
If you are coming from Phaser CE, then a scene is what is replacing a state. If you are new to Phaser altogether, think of Scenes as screens. A title scene, game over scene and the main game scene. For this example, we will be using just single state.
sceneMain.js
class SceneMain extends Phaser.Scene {
    constructor() {
        super('SceneMain');
    }
    preload()
    {

    }
    create() {
        console.log("Ready!");
    }
    update() {}
}
In a scene, we extend the class with Phaser.Scene and then we pass a unique key to the parent’s constructor. We can use this key later to switch between scenes.
Run the code, and you’ll see the “Ready” logged in the console. Copy the folder everytime you want to make a game as a template or you can download it from this site.
