
JavaScript classes can add a lot of functionality, origination and most importantly reusability which saves developers a lot of time. But for some developers, there is an understandable learning curve.
JavaScript classes are a fairly new arrival on the JavaScript scene. JavaScript has been around for ages. At least in modern computer terms.
JavaScript traces its roots back to 1993. JavaScript Classes didn’t make an appearance until 2015, with the release of ES6. This meant coders had about 20 years to get used to the unique qualities of JavaScript before everything drastically changed.
Both new users and highly paid front end developers have inquired of me about classes, so that is the purpose of this blog.
While this post does not deal with Phaser directly, JavaScript classes are very useful in making Phaser games, so I have included it here.
Once upon a time…
Once we only had variables. We made do, but it got cumbersome.
Lets set up a quick project
create a new JavaScript file called index.js and an index.html file, and link the index.js to the index.html file
Index.html
<!DOCTYPE html>
<html>
<head>
	<title></title>
	<script type="text/javascript" src="index.js"></script>
</head>
<body>

</body>
</html>
In the js file place an onload function
window.onload=function()
{

}
Say for example we were making a dungeon and dragons type game. This was what occupied most of the ’80s for me. Let’s take the concept of a player and a monster. We will need to keep up with the strength of both characters.
window.onload=function()
{
   var playerStr=10;
   var monsterStr=20;
}
Then let’s set up a function named attack to receive the data.
window.onload=function()
{
   var playerStr=10;
   var monsterStr=20;

   function attack(playerStr,monsterStr)
   {

   }
}
It is at this point we realize that we also need to take into account the armor that each character has, so we add 2 more variables and pass those to the attack function
window.onload=function()
{
   var playerStr=10;
   var monsterStr=20;

   var playerArmor=5;
   var monsterArmor=10;

   function attack(playerStr,monsterStr,playerArmor,monsterArmor)
   {

   }
}
Then of course, we realize that we need the hit points or health of both player and monster… This could go on and on! Our function parameters will just keep growing
Using Objects
Objects are basically a collection of variables. Let’s have a look at how we can pass the same information using objects instead.
To make an object we use brackets {} with variables and value pairs separated by a colon :
var player={strength:20,armor:5,health:100}
var monster={strength:40,armor:10,health:200}
We can use the variables inside an object by using the object and variable separated by a dot.
player.healthThe variables inside the object are called properties.
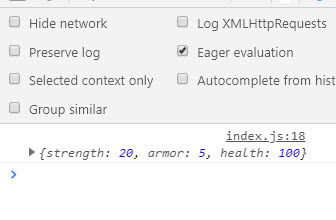
We can pass the entire objects to the attack function. Let’s also add a console.log of the player object. So now our JavaScript code will look like this:
window.onload=function()
{
  var player={strength:20,armor:5,health:100}
  var monster={strength:40,armor:10,health:200}

  attack(player,monster)
  {
      console.log(player);
  }
}
Adding Functions
We can also add functions to an objects.
player.doSomething=function()
{
   console.log("doSomething");
}
So we can also add functions like attack, move, etc. We call the function like this
player.doSomething()JavaScript Classes
While objects are a great step up from variables, classes take things a bit further. We don’t abandon objects altogether, but instead, use classes as blueprints to make objects. In other words, we will make copies of the class. These copies are known as instances.
Make a new file called char.js and link it to your index.html file.
The empty class
Inside the char.js file, copy and paste or type the following:
class Char
{

}
The above code is all that is required to make a class. The class name is Char, short for ‘character’. Of course, being empty, the class cannot do much.
The constructor function
Every class can (and should) contain a special function called a constructor. This is a function that is called when the copy is made (or constructed). This is useful for setting up initial properties.
class Char
{
  constructor()
  {
   console.log("I am new!");
  }
}
Making a new copy
In the index.js file type the following code
var char=new Char();The console output (f-12 in chrome, output tab) will display the message: I am new! This is because the new copy has been made and the constructor function has been called.
Setting properties
As I mentioned before, the variables inside objects or classes are called properties. We can make them publicly available by using the ‘this’ keyword. In the constructor, we can set the values for the player
class Char
{
constructor()
{
console.log("I am new!");
this.str=10;
this.armor=5;
this.health=100;
}
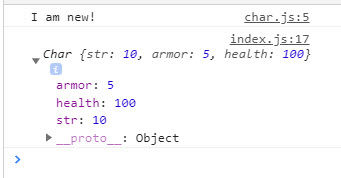
}In the index.js file we can change the old player code (//commented out) with a new instance of char
window.onload=function()
{
  //var player={strength:20,armor:5,health:100} -old code
  var player=new Char();
  var monster={strength:40,armor:10,health:200}

  attack(player,monster)
  {
     console.log(player);
  }
}
Here is the output now. Notice that the output shows that this is an instance of char.
Passing Parameters
Right now, our class is not much more than an object. Let’s make it a bit more reusable. Instead of hard-coding the values, let’s pass them on the constructor. In the index.js change the player code to:
var player=new Char(10,5,100);And let’s change the constructor in the char class to accept the values. When then assign the parameter values to the properties of the class so they will be able to be accessed from index.js.
class Char
{
	constructor(str,armor,health)
	{
		console.log("I am new!");
		this.str=str;
		this.armor=armor;
		this.health=health;
         }

}
We can now use the Char class to make the monster as well.
window.onload = function() {
    var player = new Char(10, 5, 100);
    var monster= new Char(20, 10, 150);
    attack(player, monster);

    function attack(player, monster) {
        console.log(player);
    }
}
Adding functions to the class
Just like we can add functions to objects, when we add function to the class, it will be part of every instance as well.
Let’s add one more property to the Char class called ‘name’
class Char
{
	constructor(str,armor,health,name)
	{
		console.log("I am new!");
		this.str=str;
		this.armor=armor;
		this.health=health;
		this.name=name;
	}
}
And let’s add a function to display that name called ‘who()’
class Char
{
constructor(str,armor,health,name)
{
console.log("I am new!");
this.str=str;
this.armor=armor;
this.health=health;
this.name=name;
}
who()
{
console.log("I am "+this.name);
}
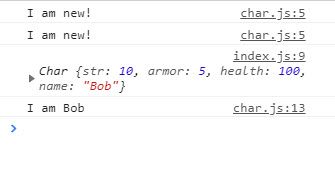
}Now let’s add some names to the player and the monster and call the who function on the player
window.onload = function() {
    var player = new Char(10, 5, 100, "Bob");
    var monster= new Char(20, 10, 150, "Otto");
    attack(player, monster);
    //
    player.who();

    function attack(player, monster) {
        console.log(player);
    }
}
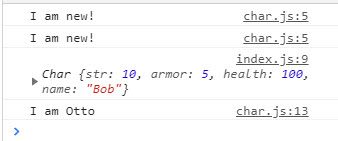
If you change player.who() to monster.who()
JavaScript Classes – Conclusion
There you have the basics of the JavaScript classes. A collection of variables, and functions of which we can make copies. There is a lot more to explore such as one class extending another, but that is a post for another time.
I hope this has been useful to you. Any questions just comment below or contact me privately.

Pingback: Learn JavaScript Classes in 10 minutes - Javascript