
Deprecated: Automatic conversion of false to array is deprecated in /home/wcc1969/public_html/phasergames.com/wp-content/plugins/publitio-offloading/includes/class-publitio-offloading.php on line 577
Deprecated: Automatic conversion of false to array is deprecated in /home/wcc1969/public_html/phasergames.com/wp-content/plugins/publitio-offloading/includes/class-publitio-offloading.php on line 577
Deprecated: Automatic conversion of false to array is deprecated in /home/wcc1969/public_html/phasergames.com/wp-content/plugins/publitio-offloading/includes/class-publitio-offloading.php on line 577
Deprecated: Automatic conversion of false to array is deprecated in /home/wcc1969/public_html/phasergames.com/wp-content/plugins/publitio-offloading/includes/class-publitio-offloading.php on line 577
Making a Phaser game in an 2 hours
Most of the time I spend about a week or two on a game for my office, mostly refining things based on suggestions the team has made. When I’m doing my own games, however, there are times that I want to bust out a game in an hour or two.
Of course, if we are going to only spend 120 minutes on a game, we are somewhat limited in the games we can make. To make it a bit easier, there are several things I always do.
Prepare the graphics and sounds ahead of time. I keep asset folders I call game kits that I may someday make a game out of or not. When I feel inspired to make a game I look through these.
I use the Phaser snippets, although I don’t do this as much as I use to, it is good for reference.
I keep a code library of game parts, that I recently released publicly as the Ultimate Game Parts Template. I’ll be using the free version to make this game.
The Game – Falling Dots
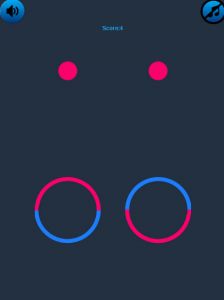
To play the game you click on the rings to flip the colors to match the top of the ring to the color of the falling dots. Both dots have to match or the game is over.
Setting Up
Download the template and make a copy of the template folder. Name the folder fallingDots
Loading the images
Open the code in your favorite editor. Then copy the images into images/main. Next, locate the js/states folder
The first file we want is stateLoad.js
Here is where we can set up all the assets.
We can still use:
game.load.images(key,path);
but to save time I’ve set up some shortcuts, the first of which is loadMain which simply loads an image from image/main/ and give it the same key as the base name. The function looks like this:
loadMain(name) {
        game.load.image(name, "images/main/" + name + ".png");
    },
So to load the images we just paste this into the end of the preload section of stateLoad.js
this.loadMain("ring");
this.loadMain("logo");
For the sprite sheets, we need to load them the same way we always have.
game.load.spritesheet("dots", "images/main/dots.png", 40, 40);

Loading Audio
For the audio, I also set up 2 helper functions. 1 for .mp3 files and 1 for .wav files. Note: These are already in the template.
loadSFX(name) {
        game.load.audio(name, "audio/sfx/" + name + ".mp3");
        model.regSound(name);
    },
    loadSFX2(name) {
        game.load.audio(name, "audio/sfx/" + name + ".wav");
        model.regSound(name);
    },
This will load an audio file from the audio/sfx folder making the key the same name as the file
So we load our audio files like this:
this.loadSFX2("beep");
this.loadSFX("hit");
this.loadSFX2("click");
and the background music
game.load.audio("backgroundMusic", "audio/background/background.mp3");
the last step is to locate this line in the stateLoad.js create file (line 52) and change the audio key if needed
mediaManager.setBackgroundMusic("backgroundMusic");
Note: the media manager is a class that manages the sound in the game
StateLoad.js should now look like this:
var StateLoad = {
    preload: function() {
        model.state = "load";
        var empty = game.add.image(0, 0, "loadingEmpty");
        var full = game.add.image(0, 0, "loadingFull");
        empty.anchor.set(0.5, 0.5);
        empty.x = game.width / 2;
        empty.y = game.height / 2;
        //
        //
        full.anchor.set(0, 0.5);
        full.x = game.world.centerX - empty.width / 2;
        full.y = empty.y;
        game.load.setPreloadSprite(full);
        //PRELOAD EVERYTHING HERE
        //
        //
        //
        //
        var theme = new BlueTheme();
        theme.loadTheme();
        //Preload all text buttons
        TextButton.preloadAll();
        //Preload all icons
        //preload images
        // game.load.image("heart", "images/main/heart.png");
        game.load.spritesheet("dots", "images/main/dots.png", 40, 40);
        this.loadMain("ring");
        this.loadMain("logo");
        //
        //
        //
        game.load.audio("backgroundMusic", "audio/background/background.mp3");
        //game.load.audio("elephant","audio/sfx/elephant.mp3");
        this.loadSFX2("beep");
        this.loadSFX("hit");
        this.loadSFX2("click");
    },
    loadMain(name) {
        game.load.image(name, "images/main/" + name + ".png");
    },
    loadSFX(name) {
        game.load.audio(name, "audio/sfx/" + name + ".mp3");
        model.regSound(name);
    },
    loadSFX2(name) {
        game.load.audio(name, "audio/sfx/" + name + ".wav");
        model.regSound(name);
    },
    create: function() {
        //pass the key for background music to the media manager
        mediaManager.setBackgroundMusic("backgroundMusic");
        //pass sound keys to the media manager
        //a sound object will be created
        model.sfx.forEach(function(sound) {
            mediaManager.addSound(sound);
        }.bind(this));
        if (model.devMode == true) {
            model.musicOn = false;
            game.state.start("StateMain");
        } else {
            game.state.start("StateTitle");
        }
    },
    update: function() {}
}
Making the game.
Aligning and scaling
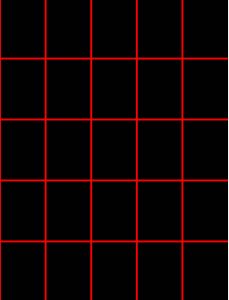
Now that the assets are loaded the first thing that we will do is make an alignment grid. This will allow us to position the game elements regardless of the size of the game. That means by using this method our game elements will be placed in the correct place on phone, table, and computer.
Find out more about the Align Grid
Place this in the create function of stateMain
//make an alignment grid
this.agrid = new AlignGrid(5, 5);
For debugging we can turn on the grid
//for debugging
this.agrid.show();
And this is the result:
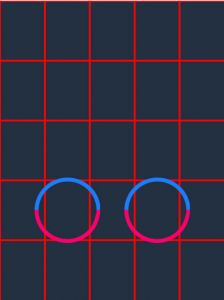
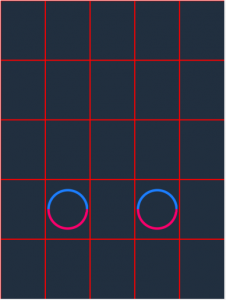
Now, let’s add in the rings, and we will set the background color to gray
//add the rings to the game
 //
 this.ring1 = game.add.sprite(0, 0, "ring");
 this.ring2 = game.add.sprite(0, 0, "ring");
 //set the rings' anchors
 //
 this.ring1.anchor.set(0.5, 0.5);
 this.ring2.anchor.set(0.5, 0.5);
The reason for setting the rings’ x and y positions at 0,0 is because we will be placing the rings with the grid class
this.agrid.placeAt(x,y,sprite);
the x and y positions start at 0
//Align the rings to the grid
//
this.agrid.placeAt(1, 3, this.ring1);
this.agrid.placeAt(3, 3, this.ring2);
We also need to scale the rings by getting the game.width to sprite.width ratio. You can find this by using the Align utility
Align.getScaleToGameW(this.ring1);
This will log out to the browser’s developer panel
I get the output:0.2916666666666667
We then set the scale of the rings based on that
Align.scaleToGameW(this.ring1, 0.29166);
Align.scaleToGameW(this.ring2, 0.29166);
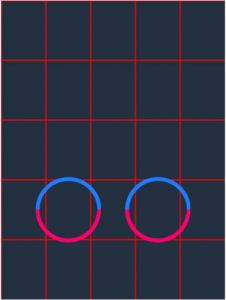
You will not see any visible changes unless you switch to view in a mobile view.
Here is how it looks now on the laptop version
If you turn off the scaling, here is how it looks on the iPad. Notice that the rings are smaller than the cells.
With the scaling turned on, the rings are scaled correctly
Flipping the ring
To keep track of what color the ring is, we will set a custom property of color in the ring sprite
//set the rings' initial color
this.ring1.color = 1;
this.ring2.color = 1;
Let’s now make a function to flip the rings.
When you first create a sprite, the angle is a 0, if the angle is 0, then we change the angle to 180, or vice versa. We will also update the color based on the angle.
changeRing(target) {
        //whatever the ring is
        //change it
        if (target.angle == 0) {
            target.angle = 180;
            target.color = 0;
        } else {
            target.angle = 0;
            target.color = 1;
        }
    },
Now we set the listeners to flip the rings
In the create function
//set listeners
this.ring1.inputEnabled = true;
this.ring2.inputEnabled = true;
this.ring1.events.onInputDown.add(this.changeRing, this);
this.ring2.events.onInputDown.add(this.changeRing, this);
Clicking the rings will now flip them.
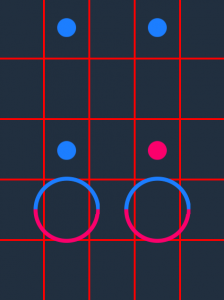
Making the Dots
We need to have two dots fall at the same time, so we will make a group of two dots called a row.
We will also need a group to hold the rows
In the create function
//make a group to hold the rows of dots
this.rowGroup = game.add.group();
Let’s set up a function to make the rows.
makeRow() {
        //
        //
        /*  make a group to hold the dots*/
        var dotGroup = game.add.group();

        //make the left dot
        var dot1 = game.add.sprite(0, 0, "dots");

        //set the anchor
        dot1.anchor.set(0.5, 0.5);

        //scale it to the game
        Align.scaleToGameW(dot1, 0.083);

        //put the dot on a random frame
        dot1.frame = game.rnd.integerInRange(0, 1);

        //make the right dot
        var dot2 = game.add.sprite(0, 0, "dots");
        //set the anchor
        dot2.anchor.set(0.5, 0.5);
        //scale it to the game
        Align.scaleToGameW(dot2, 0.083);
        //put the dot on a random frame
        dot2.frame = game.rnd.integerInRange(0, 1);

        //line up the dots on the grid
        this.agrid.placeAt(1, 1, dot1);
        this.agrid.placeAt(3, 1, dot2);

        //add the dots to the group
        dotGroup.add(dot1);
        dotGroup.add(dot2);

        //although we lined up the grid
        //it is important to make sure the dot
        //y position is at 0
        dot1.y = 0;
        dot2.y = 0;

        //place the group off the top of the screen
        dotGroup.y = -100;

        //when the dotGroup gets too low
        //we need to add a new row
        //since we need to do this only once, we set a flag
        //in the group
        dotGroup.triggerFlag = false;
        //when the dotGroup gets too low
        //we need to check if the dots match
        //since we need to do this only once, we set a flag
        //in the group
        dotGroup.checkFlag = false;

        this.rowGroup.add(dotGroup);
    }
At the end of the create function call the makeRow function
this.makeRow();
Making the rows fall
To be able to change the speed set up a variable in the create function
this.speed = 2.5;
We will move everything down with the code in the update function
update: function() {
        this.rowGroup.forEach(function(row) {
            //update the row's y positons
            row.y += this.speed;
            //
            //if the row is greater than 25% of the
            //game's height make a new row if we
            //have not done so already
            if (row.y < game.height / 4 && row.triggerFlag == false) {
                row.triggerFlag = true;
                this.makeRow();
            }
            //
            //if the row is greater than the hit point
            //and we have not checked already
            if (row.y < this.hitPoint && row.checkFlag == false) {
                row.checkFlag = true;

                //get the dots from the row
                var dot1 = row.getChildAt(0);
                var dot2 = row.getChildAt(1);

                //check if the dots frames are equal to the ring's colors
                if (dot1.frame == this.ring1.color && dot2.frame == this.ring2.color) {

                    //every five points up the speed
                    if (model.score / 5 == Math.floor(model.score / 5)) {
                        this.speed += .5;
                    }
                    //destory the row
                    row.destroy();
                } else {

                    //call the game over
                    game.state.start("StateOver");
                }
            }
        }.bind(this));
Your game should now look like this
Adding Components
This is where the Ultra template will save you a lot of time with its built-in components
Adding the score box
In the create function
// make an instance of the scorebox and align it on the grid
this.scoreBox = new ScoreBox();
this.agrid.placeAt(2, 0, this.scoreBox);

You can change the font size and color or the components in the js\themes\blueTheme.js file
Adding the sound Buttons
In the create function
//add sound buttons to the state
var soundButtons = new SoundButtons();

These buttons will toggle on and off the sound and music
Events
The template is event-driven, and there is an instance of a Phaser.Signal class called eventDispatcher
To Increase the Score
This will be dispatched if the colors match the rings
//up the score
eventDispatcher.dispatch(G.UP_SCORE, 1);
The score is held in model.score and this event will trigger updates in the scoreBox
in the create function at the top, we need to clear the score if the player hits play again
model.score=0;
Playing a sound
to play a sound we dispatch a G.PLAY_SOUND event
eventDispatcher.dispatch(G.PLAY_SOUND,soundKey);
We will use the beep key if the colors match and hit if they do not
Increasing the speed
For every five points we will increase the speed. Place this code right after the score is updated
//every five points up the speed
if (model.score / 5 == Math.floor(model.score / 5)) {
        this.speed += .5;
 }
Your stateMain file should now look like this
var StateMain = {
    preload: function() {},
    create: function() {
        this.speed = 2.5;
        model.score = 0;
        //keep this line
        //to tell the game what state we are in!
        model.state = "main";
        //make an aligment grid
        this.agrid = new AlignGrid(5, 5);
        //
        //for debugging
        this.agrid.show();
        //
        // make an instance of the scorebox and align it on the grid
        this.scoreBox = new ScoreBox();
        this.agrid.placeAt(2, 0, this.scoreBox);

        //add sound buttons to the state
        var soundButtons = new SoundButtons();
        //
        //
        //background color
        game.stage.backgroundColor = "#212F3F";
        //
        //
        //add the rings to the game
        //
        this.ring1 = game.add.sprite(0, 0, "ring");
        this.ring2 = game.add.sprite(0, 0, "ring");
        //set the rings' anchors
        //
        this.ring1.anchor.set(0.5, 0.5);
        this.ring2.anchor.set(0.5, 0.5);
        //Align the rings to the grid
        //
        this.agrid.placeAt(1, 3, this.ring1);
        this.agrid.placeAt(3, 3, this.ring2);
        //
        //
        //set the rings' initial color
        this.ring1.color = 1;
        this.ring2.color = 1;
        //
        //
        //
        Align.scaleToGameW(this.ring1, 0.29166);
        Align.scaleToGameW(this.ring2, 0.29166);
        //
        //
        //
        //
        //
        //
        //set listeners
        this.ring1.inputEnabled = true;
        this.ring2.inputEnabled = true;
        this.ring1.events.onInputDown.add(this.changeRing, this);
        this.ring2.events.onInputDown.add(this.changeRing, this);
        //
        //
        //Define a y point where the rings will
        //be compared to the dots
        //we will set this just above the rings
        this.hitPoint = this.ring1.y - this.ring1.height / 2;
        //
        //make a group to hold the rows of dots
        this.rowGroup = game.add.group();
        //
        //
        //make a new row of dots for falling
        this.makeRow();
        //
    },
    changeRing(target) {
        //whatever the ring is
        //change it
        if (target.angle == 0) {
            target.angle = 180;
            target.color = 0;
        } else {
            target.angle = 0;
            target.color = 1;
        }
        //
        //play the click sound
        eventDispatcher.dispatch(G.PLAY_SOUND, "click");
    },
    makeRow() {
        //
        //
        /*  make a group to hold the dots*/
        var dotGroup = game.add.group();

        //make the left dot
        var dot1 = game.add.sprite(0, 0, "dots");

        //set the anchor
        dot1.anchor.set(0.5, 0.5);

        //scale it to the game
        Align.scaleToGameW(dot1, 0.083);

        //put the dot on a random frame
        dot1.frame = game.rnd.integerInRange(0, 1);

        //make the right dot
        var dot2 = game.add.sprite(0, 0, "dots");
        //set the anchor
        dot2.anchor.set(0.5, 0.5);
        //scale it to the game
        Align.scaleToGameW(dot2, 0.083);
        //put the dot on a random frame
        dot2.frame = game.rnd.integerInRange(0, 1);

        //line up the dots on the grid
        this.agrid.placeAt(1, 1, dot1);
        this.agrid.placeAt(3, 1, dot2);

        //add the dots to the group
        dotGroup.add(dot1);
        dotGroup.add(dot2);

        //although we lined up the grid
        //it is important to make sure the dot
        //y position is at 0
        dot1.y = 0;
        dot2.y = 0;

        //place the group off the top of the screen
        dotGroup.y = -100;

        //when the dotGroup gets too low
        //we need to add a new row
        //since we need to do this only once, we set a flag
        //in the group
        dotGroup.triggerFlag = false;
        //when the dotGroup gets too low
        //we need to check if the dots match
        //since we need to do this only once, we set a flag
        //in the group
        dotGroup.checkFlag = false;

        this.rowGroup.add(dotGroup);
    },
    update: function() {
        this.rowGroup.forEach(function(row) {
            //update the row's y positons
            row.y += this.speed;
            //
            //if the row is greater than 25% of the
            //game's height make a new row if we
            //have not done so already
            if (row.y < game.height / 4 && row.triggerFlag == false) {
                row.triggerFlag = true;
                this.makeRow();
            }
            //
            //if the row is greater than the hit point
            //and we have not checked already
            if (row.y < this.hitPoint && row.checkFlag == false) {
                row.checkFlag = true;

                //get the dots from the row
                var dot1 = row.getChildAt(0);
                var dot2 = row.getChildAt(1);

                //check if the dots frames are equal to the ring's colors
                if (dot1.frame == this.ring1.color && dot2.frame == this.ring2.color) {
                    //play the beep
                    eventDispatcher.dispatch(G.PLAY_SOUND, "beep");
                    //up the score
                    eventDispatcher.dispatch(G.UP_SCORE, 1);

                    //every five points up the speed
                    if (model.score / 5 == Math.floor(model.score / 5)) {
                        this.speed += .5;
                    }
                    //destory the row
                    row.destroy();
                } else {
                    //play the hit sound
                    eventDispatcher.dispatch(G.PLAY_SOUND, "hit");
                    //call the game over
                    game.state.start("StateOver");
                }
            }
        }.bind(this));
    }
}
There are also resources to put together a title screen. See my tutorial on how to put together a title screen here.
Play Now!