I’m sure that some of you may be nostalgic for the days of youth when the Nintendo NES was the most popular game system on the planet. My first video game was pong, which was followed quickly by the Atari 2600. I saw the Nintendo controller a bit of a breakout. The way it was set up it allowed not only for player movement and two actions, but it also provided a way to navigate on-screen menus.
When the Nintendo NES first came out in 1985, I was still using a computer without a mouse. (or internet, copy and paste, or hard drives, but I still made games!)
The games of those days may seem a bit simple compared to now, but with the advent of mobile devices simpler retro games have experienced a small rebirth.
This tutorial is part 3 on a series of platform games. You can find part1 on animation and part 2 on setting up a platform game on this site.
The code uses the Utility Template which is a template of my own devising that saves a bit of time with a few utility classes.
Game Controller Class
First, let’s make a new class so we easily use this in other games. Name a new file called gamePad.js. We will extend it by a UIBlock class to be able to use it as a lightweight container.
class GamePad extends UIBlock {
    constructor(config) {

}
}
Preload the images

Next, let’s preload the images for the game controller in the sceneMain file’s preload function. Although all the images above all included, I’m only going to use the cross and buttons.
this.load.image("cross", "images/controls/cross.png");
this.load.image("redButton", "images/controls/redButton.png");
this.load.image("hidden", "images/controls/hidden.png");
this.load.image("controlBack", "images/controls/controlBack.png");
Put the controller into the scene
Now add the controller to the scene. At this point, it will be just an empty object. We will pass both the scene and the alignGrid into the constructor. We will use the grid to line up the images to the grid. For now, the controller will be positioned at an x and y position of 0,0 so we can properly line up the graphics. Later we will position the gamePad in the game.
 this.gamePad = new GamePad({
            scene: this,
            grid: this.aGrid
        });
Make class members
We will need to access the config variables in the rest of the functions. We will create class members to promote the config properties.
class GamePad extends UIBlock {
    constructor(config) {
        super();
        this.scene = config.scene;
        this.grid = config.grid;
   }
}
Add the graphics to the game pad
Now we can start adding in the graphics into the gamePad class.
Turn on the grid
First, go back to sceneMain and make sure the alignGrid’s numbers are turned on to help with positioning.
//
//show the numbers
//
this.aGrid.showNumbers();
Here is how we will position the images on the grid.
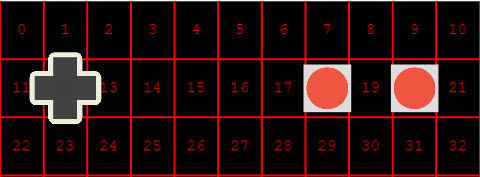
add the cross
Add the cross into position 12, and scale it to 15% of the game’s width, by using the Align class
this.cross = this.scene.add.image(0, 0, 'cross');
Align.scaleToGameW(this.cross, .15);
this.grid.placeAtIndex(12, this.cross);
Add the buttons
Next, add in 2 red button images and positions 18 and 20 and scale them to 10% of the game’s width.
this.btn1 = this.scene.add.image(0, 0, "redButton");
Align.scaleToGameW(this.btn1, .1);
this.grid.placeAtIndex(18, this.btn1);
//
//
//
this.btn2 = this.scene.add.image(0, 0, "redButton");
Align.scaleToGameW(this.btn2, .1);
this.grid.placeAtIndex(20, this.btn2);
Add invisible buttons
Because the cross is one image it is difficult to determine which section of the cross is being pressed. To keep things simple let’s place a white square over each of the places that can be pressed. We will later set the transparencies to hide the squares.
this.btnUp = this.scene.add.image(this.cross.x, this.cross.y - this.cross.displayHeight / 2, "hidden");

this.btnDown = this.scene.add.image(this.cross.x, this.cross.y + this.cross.displayHeight / 2, "hidden");

this.btnLeft = this.scene.add.image(this.cross.x - this.cross.displayWidth / 2, this.cross.y, "hidden");

this.btnRight = this.scene.add.image(this.cross.x + this.cross.displayWidth / 2, this.cross.y, "hidden");
Here is how the controller should look now.
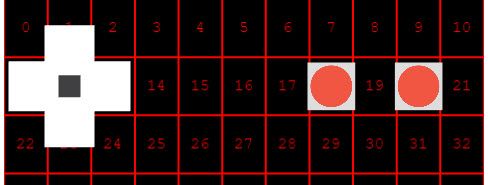
Now let’s hide the buttons by setting them to a very low alpha value. The reason we will not set visible to false is that doing so will not allow the images to be clicked.
this.btnUp.alpha = .01;
this.btnDown.alpha = .01;
this.btnLeft.alpha = .01;
this.btnRight.alpha = .01;
add the back
The last image we need to bring in is the grey background. Place this at the very top of adding the images, to ensure it goes behind all the other images.
let back = this.scene.add.image(-30, 0, "controlBack").setOrigin(0, 0);
Align.scaleToGameW(back, 1.1);
this.add(back);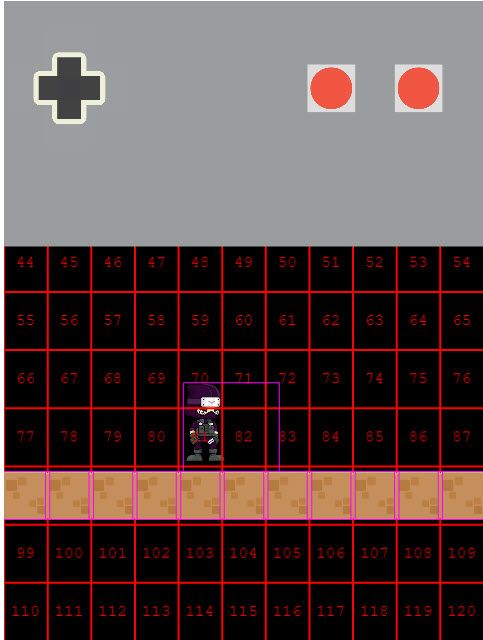
Place the controller
text
this.gamePad = new GamePad({
            scene: this,
            grid: this.aGrid
        });

this.aGrid.placeAtIndex(88, this.gamePad);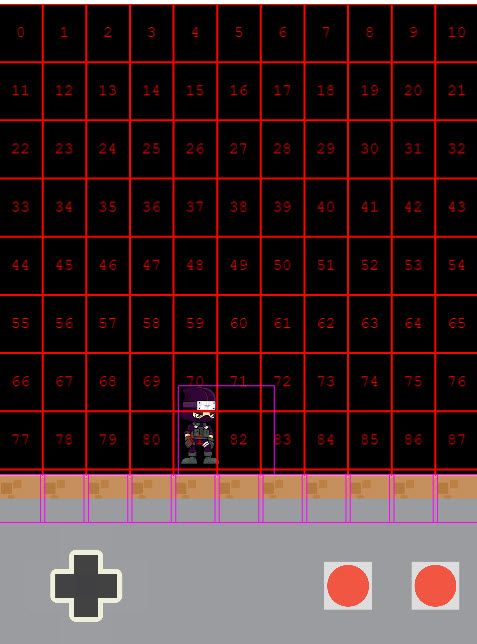
Hook up the buttons
set buttons to interactive
Make all the buttons clickable by using setInteractive()
this.btnUp.setInteractive();
this.btnDown.setInteractive();
this.btnLeft.setInteractive();
this.btnRight.setInteractive();
this.btn1.setInteractive();
this.btn2.setInteractive();
Add listeners
Add listeners to each button that will call a function.
this.btnUp.on('pointerdown', this.goUp.bind(this));
this.btnDown.on('pointerdown', this.goDown.bind(this));
this.btnLeft.on('pointerdown', this.goLeft.bind(this));
this.btnRight.on('pointerdown', this.goRight.bind(this));
this.btn1.on('pointerdown', this.btn1Pressed.bind(this));
this.btn2.on('pointerdown', this.btn2Pressed.bind(this));
Add functions
Lastly, add those functions to be called. For now, we will just log out which button is being pressed.
    goUp() {
        console.log("go Up");
    }
    goDown() {
        console.log("go Down");
    }
    goLeft() {
        console.log("go Left")
    }
    goRight() {
        console.log("go Right");
    }
    btn1Pressed() {
        console.log("btn1 pressed");
    }
    btn2Pressed() {
        console.log("btn2 pressed");
    }
Below is the entire code so far
GamePad.js
class GamePad extends UIBlock {
    constructor(config) {
        super();
        this.scene = config.scene;
        this.grid = config.grid;
        let back = this.scene.add.image(-30, 0, "controlBack").setOrigin(0, 0);
        Align.scaleToGameW(back, 1.1);
        this.add(back);
        //
        //
        //
        this.cross = this.scene.add.image(0, 0, 'cross');
        Align.scaleToGameW(this.cross, .15);
        this.grid.placeAtIndex(12, this.cross);
        //
        //
        //
        this.btn1 = this.scene.add.image(0, 0, "redButton");
        Align.scaleToGameW(this.btn1, .1);
        this.grid.placeAtIndex(18, this.btn1);
        //
        //
        //
        this.btn2 = this.scene.add.image(0, 0, "redButton");
        Align.scaleToGameW(this.btn2, .1);
        this.grid.placeAtIndex(20, this.btn2);
        //
        //
        //
        this.btnUp = this.scene.add.image(this.cross.x, this.cross.y - this.cross.displayHeight / 2, "hidden");
        this.btnDown = this.scene.add.image(this.cross.x, this.cross.y + this.cross.displayHeight / 2, "hidden");
        this.btnLeft = this.scene.add.image(this.cross.x - this.cross.displayWidth / 2, this.cross.y, "hidden");
        this.btnRight = this.scene.add.image(this.cross.x + this.cross.displayWidth / 2, this.cross.y, "hidden");
        //
        //
        //
        this.btnUp.setInteractive();
        this.btnDown.setInteractive();
        this.btnLeft.setInteractive();
        this.btnRight.setInteractive();
        this.btn1.setInteractive();
        this.btn2.setInteractive();
        //
        //
        //
        this.btnUp.on('pointerdown', this.goUp.bind(this));
        this.btnDown.on('pointerdown', this.goDown.bind(this));
        this.btnLeft.on('pointerdown', this.goLeft.bind(this));
        this.btnRight.on('pointerdown', this.goRight.bind(this));
        this.btn1.on('pointerdown', this.btn1Pressed.bind(this));
        this.btn2.on('pointerdown', this.btn2Pressed.bind(this));
        //
        //
        //
        //
        this.btnUp.alpha = .01;
        this.btnDown.alpha = .01;
        this.btnLeft.alpha = .01;
        this.btnRight.alpha = .01;
        //
        this.add(this.btnUp);
        this.add(this.btnDown);
        this.add(this.btnLeft);
        this.add(this.btnRight);
        this.add(this.btn1);
        this.add(this.btn2);
        this.add(this.cross);
    }
    goUp() {
        console.log("go Up");
    }
    goDown() {
        console.log("go Down");
    }
    goLeft() {
        console.log("go Left")
    }
    goRight() {
        console.log("go Right");
    }
    btn1Pressed() {
        console.log("btn1 pressed");
    }
    btn2Pressed() {
        console.log("btn2 pressed");
    }
}
SceneMain.js
class SceneMain extends Phaser.Scene {
    constructor() {
        super('SceneMain');
    }
    preload() {
        this.load.atlas("ninja", "images/ninja.png", "images/ninja.json");
        this.load.image("brown", "images/tiles/brickBrown.png");
        this.load.image("grey", "images/tiles/brickGrey.png");
        this.load.image("cross", "images/controls/cross.png");
        this.load.image("redButton", "images/controls/redButton.png");
        this.load.image("hidden", "images/controls/hidden.png");
        this.load.image("controlBack", "images/controls/controlBack.png");

    }
    create() {


       //
        //add a physics group
        //
        this.brickGroup = this.physics.add.group();
        //
        //add the ninja
        //
        this.ninja = this.physics.add.sprite(200, -100, "ninja");
        //
        //scale the ninja
        Align.scaleToGameW(this.ninja, .2);
        //
        //get the frame names
        //
        var frameNames = this.textures.get('ninja').getFrameNames();
        // console.log(frameNames);
        //
        // make the animations
        //
        this.makeAnims();
        //play idle animation
        this.ninja.play("idle");
        window.ninja = this.ninja;
        //
        //
        //make an align grid
        this.aGrid = new AlignGrid({
            scene: this,
            rows: 11,
            cols: 11
        });
        //
        //show the numbers
        //
        this.aGrid.showNumbers();
        //
        //make the floor
        //
        this.makeFloor(88, 98, "brown");
        //
        //add gravity to the ninja to make it fall
        //
        this.ninja.setGravityY(200);
        //
        //set a collider between the ninja and the floor
        //
        this.physics.add.collider(this.ninja, this.brickGroup);
        this.gamePad = new GamePad({
            scene: this,
            grid: this.aGrid
        });

        this.aGrid.placeAtIndex(88, this.gamePad);

    }

    placeBlock(pos, key) {
        let block = this.physics.add.sprite(0, 0, key);
        this.aGrid.placeAtIndex(pos, block);
        this.brickGroup.add(block);
        block.setImmovable();
        Align.scaleToGameW(block, .1);
    }
    makeFloor(fromPos, toPos, key) {
        for (var i = fromPos; i < toPos + 1; i++) {
            this.placeBlock(i, key);
        }
    }
    makeAnims() {
        this.anims.create({
            key: 'attack',
            frames: this.anims.generateFrameNames('ninja', {
                start: 0,
                end: 9,
                zeroPad: 3,
                prefix: 'Attack__',
                suffix: '.png'
            }),
            frameRate: 8,
            repeat: -1
        });
        this.anims.create({
            key: 'jump',
            frames: this.anims.generateFrameNames('ninja', {
                start: 0,
                end: 9,
                zeroPad: 3,
                prefix: 'Jump__',
                suffix: '.png'
            }),
            frameRate: 8,
            repeat: -1
        });
        this.anims.create({
            key: 'slide',
            frames: this.anims.generateFrameNames('ninja', {
                start: 0,
                end: 9,
                zeroPad: 3,
                prefix: 'Slide__',
                suffix: '.png'
            }),
            frameRate: 8,
            repeat: -1
        });
        this.anims.create({
            key: 'jumpAttack',
            frames: this.anims.generateFrameNames('ninja', {
                start: 0,
                end: 9,
                zeroPad: 3,
                prefix: 'Jump_Attack__',
                suffix: '.png'
            }),
            frameRate: 8,
            repeat: -1
        });
        this.anims.create({
            key: 'jumpThrow',
            frames: this.anims.generateFrameNames('ninja', {
                start: 0,
                end: 9,
                zeroPad: 3,
                prefix: 'Jump_Throw__',
                suffix: '.png'
            }),
            frameRate: 8,
            repeat: -1
        });
        this.anims.create({
            key: 'idle',
            frames: this.anims.generateFrameNames('ninja', {
                start: 0,
                end: 9,
                zeroPad: 3,
                prefix: 'Idle__',
                suffix: '.png'
            }),
            frameRate: 8,
            repeat: -1
        });
        this.anims.create({
            key: 'dead',
            frames: this.anims.generateFrameNames('ninja', {
                start: 0,
                end: 9,
                zeroPad: 3,
                prefix: 'Dead__',
                suffix: '.png'
            }),
            frameRate: 8,
            repeat: -1
        });
        this.anims.create({
            key: 'run',
            frames: this.anims.generateFrameNames('ninja', {
                start: 0,
                end: 9,
                zeroPad: 3,
                prefix: 'Run__',
                suffix: '.png'
            }),
            frameRate: 8,
            repeat: -1
        });
    }
    update() {}
}
You can download the source below
after downloading the example I uploaded to my host and run the example. It seems fin at first. I see the grid and the ninja but no game pad. the console log gives these errors
ReferenceError: UIBlock is not define
ReferenceError: can’t access lexical declaration `GamePad’ before initialization sceneMain.js
Any help would be appreciated.
It could be a couple of things. It seems the UI block code is not loading before trying to extend the class. Did you change anything? Do you have a link to your code? I’ll check it out.
It’s just a typo. Rename “UIBlock.js” to “UiBlock.js” – needs to be a lowercase i