
Deprecated: Automatic conversion of false to array is deprecated in /home/wcc1969/public_html/phasergames.com/wp-content/plugins/publitio-offloading/includes/class-publitio-offloading.php on line 577
Deprecated: Automatic conversion of false to array is deprecated in /home/wcc1969/public_html/phasergames.com/wp-content/plugins/publitio-offloading/includes/class-publitio-offloading.php on line 577
Endless runner games have become a staple among mobile games. As a game developer, you may sooner or later be asked to make something similar. Working for years in game development, I often must start coding a game well before I have the graphics for it. While waiting for the artists to finish the cool art, I use temporary art. One artist, whom I worked with referred to this as “dev art”. The idea is to get moving on the code and replace it later with better stuff.
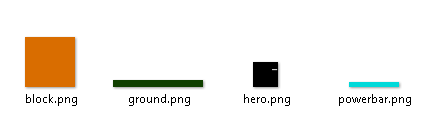
Here is the basic art I’ll be using.
- Our hero, the main character.
- Some ground to stand on.
- A Block, Something to jump over.
- A power meter to show how high to jump.
For the first part, let’s just set up the basics and get the power meter working.
Basic Template
I am using my own basic template, which is a bare-bones template that I made to save myself a little time.
You can download it here.
Adding the images
First, we preload the images by providing keys and paths in the preload function
game.load.image("ground","images/ground.png");
game.load.image("hero","images/hero.png");
game.load.image("bar","images/powerbar.png");
game.load.image("block","images/block.png");
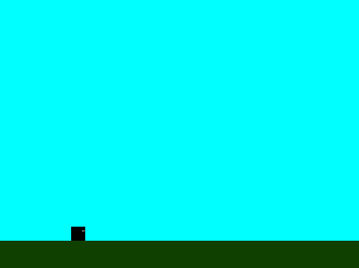
Make the Sky
Since the hero is a black square, let’s change the stage color to a sky blue
Place this in the create function
//turn the background sky blue
game.stage.backgroundColor="#00ffff";
Add the main parts
Now let’s place the ground. Since mobile sizes vary let’s just place the ground at 90% of the screen’s height or in other words 10% from the bottom. We can adjust this later. The hero is 25px tall, so we just need to set him at the same y position as the ground and subtract 25 to have him stand above the ground.
//add the ground
var ground=game.add.sprite(0,game.height*.9,"ground");
//add the hero
this.hero=game.add.sprite(game.width*.2,ground.y-25,"hero");
The game should now look like this
The Power Meter
The power meter is just a small bitmap that we can add in and change the width as the power changes. The player will change the power by holding the mouse (or finger) down and then jumping when the mouseUp event is called. The longer the mouse is down the higher the jump will be.
First, we need a variable to change.
Place this at the top of the create function
this.power=0;
Next, we place a power bar just above the hero’s head, 25 pixels to the right, and 25 pixels above the hero’s coordinates.
//add the power bar just above the head of the hero
this.powerBar=game.add.sprite(this.hero.x+25,this.hero.y-25,"bar");
this.powerBar.width=0;
Add in the listeners for the mouseUp and mouseDown
//set listeners
game.input.onUp.add(this.mouseUp, this);
game.input.onDown.add(this.mouseDown, this);
When the mouseDown is called we start a timer to keep increasing the power. When the mouseUp is called we stop that timer. We will set the timer at Phaser.Timer.Second/1000. This means the timer runs 1000 times a second. This will give us a smooth power bar effect.
mouseDown:function()
{
  this.timer=game.time.events.loop(Phaser.Timer.SECOND/1000, this.increasePower, this);
},
mouseUp:function()
{
   game.time.events.remove(this.timer);
   this.power=0;
   this.powerBar.width=0;
},
The last thing we will cover in this entry is to set up the increasePower function that increases the power variable and changes the width of the power bar. We will limit the power to 50 for now but may change it later as the game develops.
increasePower:function()
    {
    	this.power++;
    	this.powerBar.width=this.power;
    	if (this.power>50)
    	{
    	  this.power=50;
    	}
    },
Here is the final code for this lesson:
var StateMain = {
    preload: function() {
        game.load.image("ground", "images/ground.png");
        game.load.image("hero", "images/hero.png");
        game.load.image("bar", "images/powerbar.png");
        game.load.image("block", "images/block.png");
    },
    create: function() {
        this.power = 0;
        //turn the background sky blue
        game.stage.backgroundColor = "#00ffff";
        //add the ground
        var ground = game.add.sprite(0, game.height * .9, "ground");
        //add the hero in
        this.hero = game.add.sprite(game.width * .2, ground.y - 25, "hero");
        //add the power bar just above the head of the hero
        this.powerBar = game.add.sprite(this.hero.x + 25, this.hero.y - 25, "bar");
        this.powerBar.width = 0;
        //set listeners
        game.input.onUp.add(this.mouseUp, this);
        game.input.onDown.add(this.mouseDown, this);
    },
    mouseDown: function() {
        this.timer = game.time.events.loop(Phaser.Timer.SECOND / 1000, this.increasePower, this);
    },
    mouseUp: function() {
        game.time.events.remove(this.timer);
        this.power = 0;
        this.powerBar.width = 0;
    },
    increasePower: function() {
        this.power++;
        this.powerBar.width = this.power;
        if (this.power> 50) {
            this.power = 50;
        }
    },
    update: function() {}
}
And here is the result:
Here is the source code for this tutorial:
In the next lesson, we will be adding physics into the endless runner game. We will be looking at how gravity and velocity work together.
I downloaded the code. But it is not working.
Are you running it on a local server?
I believe there’s a typo in the final code block. On line 34 you have:
if (this.power > 50)
I think that should be :
if (this.power > 50)
edit: you have if (this.power > 50). It’s the html entity. My comment above displayed it as >
Yeah, it changed it the other way for me! I’ll fix it. Thanks!
Hi William! Sorry maybe for stupid question.
I am little bit newby to phaser and programming.
Correct me if I’m wrong. Main.js check mobile or desktop and than starting stateMain.js.
But i have just one js file, like this one https://codepen.io/ruslanlearncode/pen/ZvLzKe?editors=0010
(just js code, so nothing happens)
And mouse down and up not working.
In chrome devtools said an error:
“Phaser.Signal: listener is a required param of add() and should be a Function.”
I think my mistake just common, i appreciate if you point out where i am wrong.
Hey. Not a stupid question at all. I think that because you are trying to put it in a single file and not use states, the scope of the functions is global instead of local to the state. Phaser cannot find the functions because the ‘this’ keyword doesn’t apply. Is there a reason you want to avoid states?
Hmm.. I think i get it.
Actually there is no reason for avoiding, except that for me its more readeble. And for now I see no difference, because i don’t know and undestand very well js.
Thank you for pointing mistake!
I get the part about being more readable, but once the game gets larger states will help split up the code into smaller chunks.